Mastering Radar Module Arduino Projects: Tips & Guides
Build Arduino radar module projects that work. Compare motion and mmWave sensors, follow wiring tips and learn how radar beats PIR in real installations.
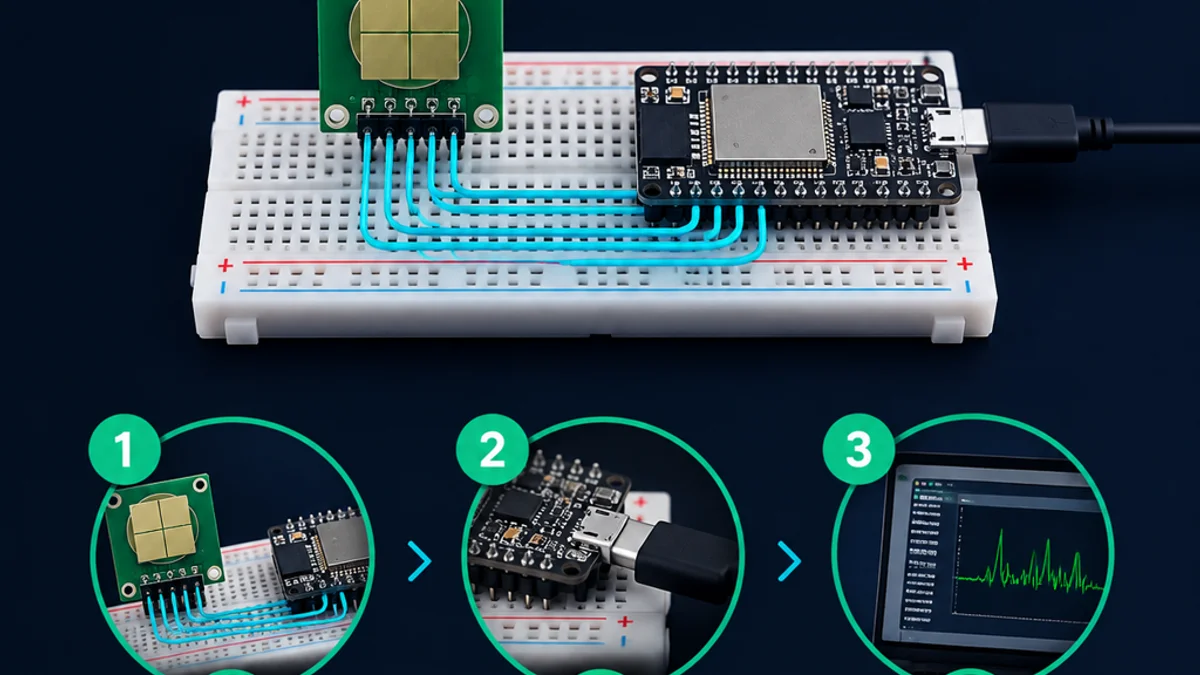
Radar modules make Arduino projects feel more aware of the physical world. Instead of only reacting to a button press, light level, or simple motion trigger, a radar sensor Arduino setup can detect movement, presence, and in some modules, distance or speed. This guide explains how an Arduino radar module works, what to look for before buying one, and how to plan a practical project without getting buried in radio-frequency theory.
What can an Arduino radar module actually do?
An Arduino radar module can send out radio waves, read reflections from nearby objects or people, and convert that activity into data your microcontroller can use. Depending on the module, that data may be as simple as a digital “presence detected” signal or as detailed as serial messages containing presence state, distance, speed, zones, or configuration values. Many hobby-friendly mmWave and microwave boards are designed to work with Arduino-style development boards over UART, GPIO, or I2C, which makes them approachable for home automation, robotics, interactive installations, and learning projects.
The key is choosing the module around the behavior you need. A room-occupancy project does not need the same radar features as a parking-assist prototype. A robot that needs rough obstacle awareness has different requirements from a sensor that must detect whether someone is sitting still at a desk. Before buying a radar module Arduino board, define the output you need first, then check whether the module exposes that output in a form your code can read.

Radar sensing in plain language
Radar works by transmitting electromagnetic waves and analyzing what comes back after those waves reflect from objects. In small Arduino-compatible modules, the complex signal processing is usually handled by the sensor board itself. Your Arduino often receives simplified data rather than raw radio information, which is good for quick projects but important to understand if you want advanced control.
Many maker-oriented modules are sold as microwave or mmWave radar sensors. “mmWave” generally refers to millimeter-wave radar, often used for short-range sensing where compact antennas and sensitivity to small motion are useful. Some 24 GHz modules are marketed for human presence detection and may detect moving, micro-moving, or stationary humans depending on the firmware and algorithm inside the product. DFRobot, for example, describes one 24 GHz human-presence sensor as using FMCW/CW modulation and providing results through serial or I/O output. (wiki.dfrobot.com)
This is different from ultrasonic sensing. An ultrasonic module sends sound waves, while radar uses radio waves. Radar can be better suited for presence and motion through certain non-metallic coverings, and it is less dependent on visible light. However, it can also be sensitive in ways that surprise beginners, especially around reflective objects, sensor angle, and firmware filtering.
The main types of radar modules used with Arduino
Not every radar sensor arduino project needs the most advanced mmWave board. The right choice depends on the data type, detection style, interface, and environment.
Simple motion or presence modules
The simplest radar modules behave almost like a smarter motion switch. They may provide a high or low signal when motion or presence is detected. These are useful when you want to turn on a light, wake a display, log activity, or trigger a sound without calculating exact distance.
A basic GPIO-style output keeps the code short. You can connect the output to a digital input pin, read the state, and decide what your project should do. The tradeoff is that you get limited detail. If the module says “detected,” you may not know whether the target is near or far, moving quickly or slowly, or in which part of the room it appeared.
UART-based presence sensors
UART modules send data through serial communication. These are popular because Arduino boards can read serial messages using hardware serial ports or software serial libraries. A UART radar module arduino project can often read presence status, configuration feedback, and sometimes more advanced data frames.
Seeed Studio’s MR24HPC1 documentation, for instance, explains using Arduino or Seeeduino with the sensor through UART serial wiring, including 5V, GND, RX, and TX connections. The same documentation notes that software serial is commonly used on the Arduino side to avoid mixing debug output with sensor communication. (wiki.seeedstudio.com)
UART sensors are a good middle ground. They offer richer feedback than a single output pin, but they are still manageable for beginners who are comfortable opening the Serial Monitor and parsing simple messages.
Distance and speed radar modules
Some modules are designed for distance measurement, speed acquisition, or target tracking rather than simple presence. These are useful for parking aids, approach detection, people counters, moving-object experiments, and robotics. DFRobot’s C4001 guide, for example, describes using Arduino with a mmWave sensor to measure distance and speed, configure thresholds, set sensor mode, and interpret output data. (wiki.dfrobot.com)
This category requires more planning. You need to know the field of view, update rate, minimum and maximum range, and whether the module tracks one target or multiple targets. If your project depends on reliable measurement rather than a yes/no trigger, spend more time reading the datasheet and example code before building the enclosure.
Specialized human-presence and health-adjacent modules
Some radar modules are tuned for static human presence, fall detection, breathing-related monitoring, or sleep-oriented detection. These sensors often include proprietary firmware that interprets radar returns and exposes only processed outputs. That can be convenient, but it also limits experimentation.
Seeed Studio’s mmWave documentation lists open-source materials for several boards, while also noting that raw data and algorithms in its mmWave radar sensors are non-open source. (wiki.seeedstudio.com) For most Arduino projects, this is not a problem. For research, custom signal processing, or machine-learning experiments, it matters a lot.
How do you choose the right radar sensor Arduino setup?
Choose the setup by matching the sensor’s output to the decision your Arduino must make. If your project only needs to know whether someone is present, a GPIO or simple UART presence module may be enough. If it needs distance, speed, zones, or configuration control, look for a module with documented serial commands, an Arduino library, and examples that match your board.
Start with the project behavior, not the component listing. Ask what your project must decide, how often it must decide it, and what should happen when the reading is uncertain. A good module choice makes your code simpler because the sensor output already resembles the logic you need.
Use this checklist before buying:
- Output type: Does the module provide GPIO, UART, I2C, or another interface your Arduino supports?
- Data detail: Do you need only presence, or do you need distance, speed, target zones, or confidence values?
- Voltage compatibility: Can the module be powered safely by your Arduino board, and are the logic levels compatible?
- Current draw: Can your power supply provide enough current without causing resets or unstable readings?
- Library support: Is there an Arduino library, example sketch, or clear serial protocol?
- Mounting direction: Does the sensor need to face the target directly, or can it be angled?
- Detection environment: Will the sensor be near fans, curtains, pets, metal surfaces, glass, moving machines, or other sources of false triggers?
- Firmware limits: Does the module expose raw data, processed events, or only fixed outputs?
A beginner-friendly radar module Arduino project usually benefits from a module that has official wiring diagrams and sample code. DFRobot’s 24 GHz microwave radar example, for instance, provides Arduino UNO setup guidance, wiring instructions, and sample code for single-target detection. (wiki.dfrobot.com)
Interfaces and wiring considerations
Wiring a radar module is usually straightforward, but small mistakes can create confusing symptoms. The most common issue is mixing up TX and RX. On UART modules, the sensor’s TX typically connects to the microcontroller’s RX, and the sensor’s RX connects to the microcontroller’s TX. Ground must be shared, and the supply voltage must match the module’s requirements.
If you use an Arduino Uno, remember that the main hardware serial port is also used for USB communication with your computer. That is why many examples use SoftwareSerial for the sensor and reserve Serial for debug messages in the Serial Monitor. On boards with multiple hardware serial ports, such as many ESP32-style boards or some larger Arduino boards, you may prefer hardware serial for better reliability at higher baud rates.
A simple wiring plan should include:
- Power first: Confirm whether the module expects 3.3V, 5V, or a range.
- Logic level next: Do not assume a 5V Arduino input is safe for every 3.3V module or that every module tolerates 5V logic.
- Shared ground: Connect module GND and Arduino GND.
- Cross serial lines: Connect module TX to Arduino RX and module RX to Arduino TX or the software serial pins selected in code.
- Add stable power: If the module draws more current than expected, use a reliable external supply with common ground.
- Test before enclosing: Run the example sketch with the module exposed before mounting it inside a case.
This careful approach saves time. Radar sensors can appear “wrong” when the real problem is a weak power source, reversed serial pins, or a sketch listening on the wrong port.

Practical project ideas for Arduino radar modules
Radar modules are especially interesting when traditional sensors are awkward. They can help with presence detection in low light, motion sensing without a camera, and interaction where users should not need to touch anything.
Smart room presence detection
A radar presence sensor can make a smart room feel more natural. Instead of turning lights off when a person sits still, a static-presence-capable module may continue detecting occupancy. This is one reason mmWave sensors have become popular in desks, bathrooms, closets, and small automation zones.
For an Arduino version, the logic can be simple: if presence is detected, keep a relay active or send a message to another controller. Add a timeout so the light does not flicker when readings briefly change. If your module allows sensitivity and delay settings, tune them after the sensor is installed, not while it is lying flat on your desk.
Contactless display wake-up
A radar module can wake a dashboard, information kiosk, or desktop display when someone approaches. Compared with a pushbutton, this feels cleaner and more interactive. Compared with a camera, it is simpler and avoids image capture.
In this project, the Arduino can read radar state and control a transistor, relay, USB HID action, or serial message to another device. You may not need distance measurement; presence within a defined zone may be enough. The main challenge is preventing accidental wake-ups from movement behind or beside the display, so placement and beam direction matter.
Parking or approach assist
A distance-capable radar module can support a parking guide or approach warning system. The Arduino could drive LEDs that change color as an object approaches or trigger a buzzer when the measured distance crosses a threshold. If the module provides speed as well, you can build more interesting behavior, such as warning sooner when an object approaches quickly.
For this use case, avoid assuming every presence sensor can measure distance. Read the documentation carefully. Some sensors are optimized for human presence and may not expose reliable range data for your intended object.
Robot obstacle awareness
Radar can complement ultrasonic, infrared, and camera-based sensing in a robot project. It may help detect motion or presence in conditions where optical sensors struggle. However, radar modules designed for room presence may not behave like precision obstacle sensors.
A useful beginner robot experiment is to use radar as a secondary input rather than the only navigation sensor. For example, the robot can slow down when radar detects motion ahead, while ultrasonic or lidar-style sensors handle close obstacle distance. This reduces the burden on the radar module and makes the project easier to debug.
Interactive art and sound installations
Because radar can detect motion without requiring touch, it works well in interactive installations. A person approaching a sculpture could change the lighting pattern. Small hand movements could trigger sound layers. Movement near a wall-mounted object could wake LEDs hidden behind translucent material.
In creative projects, exact measurement is often less important than a smooth response. Add filtering in your Arduino code so the output fades, ramps, or debounces instead of jumping instantly. This makes the interaction feel intentional rather than twitchy.
Coding patterns that make radar projects more reliable
Most Arduino radar projects start with an official example sketch. That is the right move, but the example is only the beginning. Once you confirm that the module works, reshape the code around your project’s behavior.
Separate reading from action
Keep sensor-reading code separate from output-control code. One function should update the radar state. Another should decide what to do with that state. This makes it easier to swap modules later or add filtering.
For example, your code might maintain variables such as presenceDetected, lastDetectionTime, and currentDistance. Your output logic can then decide whether to turn on an LED, send a message, or wait for confirmation.
Use time-based logic instead of long delays
Avoid filling your sketch with long delay() calls. Radar events can change while the Arduino is waiting. Use millis()-based timing for timeouts, sampling intervals, and output delays.
A presence project might keep a light on for two minutes after the last detected event. Instead of delaying for two minutes, store the time of the last detection and keep checking whether the timeout has expired. This keeps the Arduino responsive.
Add smoothing and debouncing
Radar readings can fluctuate, especially during setup or in busy environments. If your project reacts instantly to every change, it may chatter. Debouncing prevents a single brief reading from causing an unwanted action.
Try these approaches:
- Require the same state to appear several times before accepting it.
- Use a short confirmation window before triggering an output.
- Hold the active state for a minimum time once triggered.
- Ignore impossible jumps, such as a distance value changing dramatically for one sample and immediately returning.
- Log raw messages during testing so you can see whether the problem is code logic or sensor behavior.
Store configuration choices clearly
If your module supports sensitivity, distance gates, delay time, or mode settings, keep those values near the top of your sketch. Add comments explaining why you selected them. Future you will appreciate knowing whether a threshold was chosen for a hallway, desk, garage, or test bench.
For projects that may be moved between rooms, consider making settings adjustable through serial commands, buttons, or a small display. That keeps tuning from becoming a code-upload cycle.
Installation affects performance as much as code
A radar sensor is not just an electronic component; it is also a directional sensing device. Where and how you mount it can completely change the results. A module that works beautifully on your bench may behave badly once it is placed near metal, behind thick material, or aimed across a busy room.
DFRobot’s documentation for one 24 GHz human-presence sensor emphasizes paying attention to beam angle and facing the antenna toward the measured target. The same page lists a beam angle for that module, which reinforces an important point: detection is not equally strong in every direction. (wiki.dfrobot.com)
Use a practical installation process:
- Bench test the sensor with the official example sketch.
- Mark the intended sensing zone with tape or objects so you can repeat tests.
- Mount temporarily using tape, clips, or a 3D-printed prototype bracket.
- Test real behavior with people moving, sitting still, entering, leaving, and standing near edges of the zone.
- Adjust angle and height before changing code.
- Tune sensitivity or thresholds only after placement is close to final.
- Enclose last, then test again because plastic, mounting hardware, and nearby surfaces can affect results.
For room projects, avoid pointing the sensor at moving fans, curtains, open windows, vibrating appliances, or high-traffic background areas unless you want those movements included. In garages or workshops, watch for metal surfaces that can create reflections. In small rooms, reducing sensitivity may work better than trying to mask false triggers in code.
Common mistakes and how to avoid them
Many Arduino radar problems are not caused by a defective module. They come from unclear expectations, poor wiring, unstable power, or testing in an unrealistic environment.
Here are the mistakes worth avoiding:
- Buying a presence sensor for distance measurement: Some modules expose only detected/not detected output. If distance matters, confirm that range data is available.
- Ignoring serial voltage levels: A sensor may power from 5V but communicate at 3.3V, or it may not tolerate 5V logic.
- Using the wrong serial port: If the Serial Monitor works but the sensor is silent, your sketch may be listening on the wrong pins.
- Testing only by waving a hand: A human-presence module may be designed for full-body presence, micro-movement, or specific installation conditions.
- Skipping documentation: Radar modules often have modes, commands, or timing requirements that are not obvious from the pin labels.
- Mounting too early: Enclosures and final placement can change readings, so tune after mounting, not before.
- Expecting raw radar data from every board: Many maker modules expose processed results only, especially those built for presence detection.
A good debugging habit is to simplify. First confirm power. Then confirm serial communication. Then print raw or library-provided sensor messages. Only after that should you connect relays, motors, network code, displays, or complex automation logic.
Safety, privacy, and project responsibility
Arduino radar modules are often used because they can detect presence without cameras. That can be a privacy advantage, especially in rooms where image capture would be inappropriate. Still, presence sensing can reveal behavior patterns, so it deserves thoughtful use.
If your project logs occupancy, make it clear to users. Store only what you need. Avoid presenting hobby-grade sensing as a medical, security, or life-safety system unless the entire design is built and certified for that purpose. A module that is fun and useful for automation should not be treated as a guaranteed fall detector, burglar alarm, or health monitor without proper validation.
There is also radio compliance to consider. Buy modules from reputable suppliers, follow the intended operating conditions, and avoid modifying antennas or transmission behavior unless you understand the regulations that apply in your locati0n. For most makers, the safest path is to use complete modules as documented rather than designing RF hardware from scratch.
A simple build plan for your first project
If this is your first arduino radar module build, start with a desk presence indicator. It is useful, easy to observe, and does not require dangerous voltages or moving parts.
Follow this path:
- Choose a documented module with an Arduino example and either GPIO or UART output.
- Wire only the sensor and one LED at first. Do not add relays, Wi-Fi, screens, or motors yet.
- Upload the official example and confirm that the Serial Monitor shows expected activity.
- Print clear states such as “present,” “not present,” or the distance value if available.
- Add a timeout so the LED stays on briefly after the last detection.
- Move the sensor to the actual desk position and test sitting still, leaving, and walking nearby.
- Tune thresholds or sensitivity if the module supports it.
- Only then add the final output, such as a lamp controller, status display, or home-automation message.
This project teaches the essential skills: wiring, serial communication, timing logic, filtering, and installation. Once it works, you can reuse the same structure for larger projects.
Final takeaway
Radar modules open up Arduino projects that feel more responsive, subtle, and aware than simple switches or basic motion sensors. The best results come from matching the module to the job: simple presence for lights and wake-up triggers, UART feedback for configurable projects, and distance or speed sensors for measurement-focused builds.
Start with official examples, keep the first version simple, and treat placement as part of the design rather than an afterthought. With a clear goal and a well-documented radar module arduino setup, you can build reliable contactless projects that are practical, interesting, and ready to expand.
Not sure which sensor fits your project?
Talk to our mmWave application engineers for a free consultation.
Specify your hotel project with our engineers
Send your room count, ceiling type, and protocol preference. We will return a sample plan and quote within 24 business hours.
- Move from general guidance into a product or application discussion.
- Use RFQ when pricing, drawings, MOQ, or launch timing needs structure.
- Keep a direct contact path visible for fast clarifications and handoff.