Optimizing Your ESP32 Radar Module Projects
Wire an ESP32 radar module for motion, presence and distance detection. Covers sensor selection, UART wiring, firmware logic and automation project ideas.
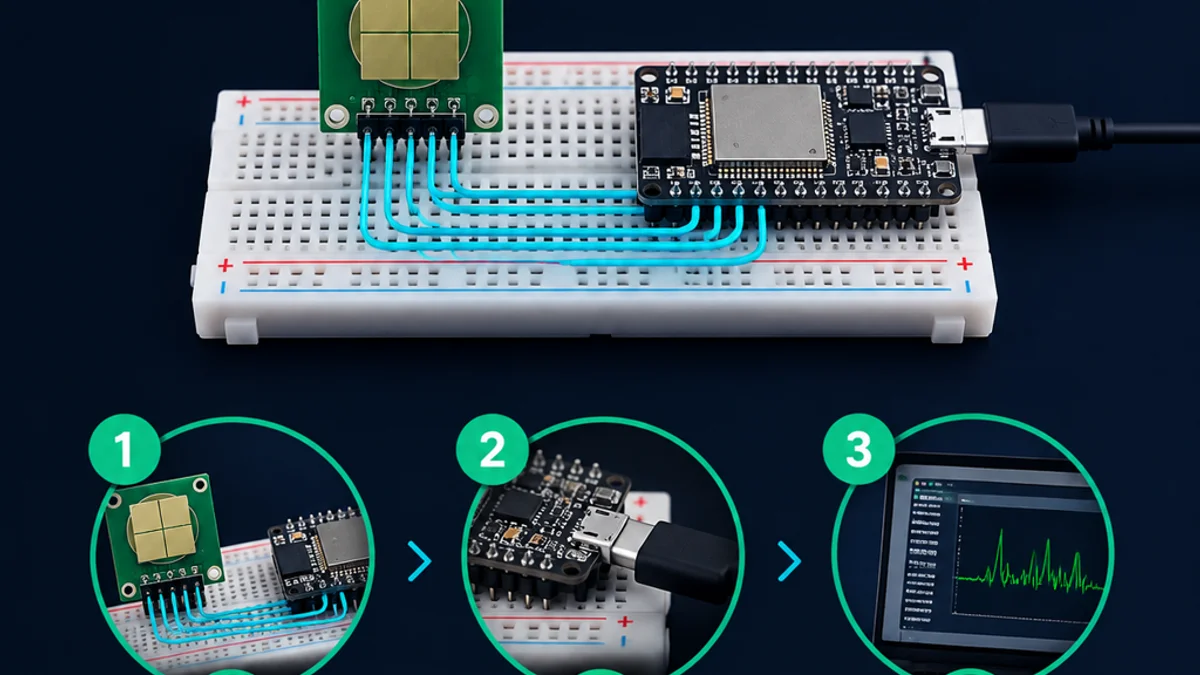
An ESP32 paired with a compact radar sensor can turn a simple electronics build into a smarter motion, distance, or presence-detection system. Whether you are planning an esp32 radar project for home automation, occupancy sensing, robotics, or a learning prototype, the key is choosing the right module, wiring it safely, and designing your code around the type of data the sensor actually provides.
Unlike a basic motion trigger, an esp32 radar setup can often detect movement without relying on visible light and can work inside enclosures when the material is suitable. That makes a radar module esp32 build especially useful when you want discreet sensing, network connectivity, and flexible automation logic in one small device.
What does a radar module do with an ESP32?
A radar module connected to an ESP32 sends out radio-frequency signals and reads the reflected signal changes caused by motion, presence, or distance. The ESP32 does not usually “create” radar by itself; it acts as the controller that powers the module, receives sensor data, processes events, and sends results to Wi-Fi, Bluetooth, MQTT, a dashboard, or another device.
In practical terms, the radar module is the sensing front end, while the ESP32 is the brain. Depending on the sensor, your project may receive a simple high-or-low detection signal, a stream of serial data, distance zones, movement energy values, or configurable sensitivity settings. The ESP32 can then decide what to do next: turn on a light, log occupancy, wake another circuit, publish a message, or trigger an alarm condition.
This combination is popular because it fits a wide range of projects. A beginner can start with a module that only has a digital output pin. A more advanced builder can use a UART-based mmWave presence sensor and tune thresholds for different distances, rooms, or behaviors.

Why ESP32 works well for radar projects
The ESP32 is a strong companion for radar modules because it brings wireless connectivity, enough processing capability for sensor logic, and broad development support. You can prototype with Arduino-style code, move into ESP-IDF for deeper control, or integrate the device with common smart-home and IoT workflows.
For many builds, the ESP32 is not doing heavy radar signal processing. The module handles the RF sensing and exposes simplified data. That keeps the project approachable while still allowing meaningful control in firmware.
Key advantages include:
- Wi-Fi connectivity: Send detection events to a local server, MQTT broker, Home Assistant setup, or cloud endpoint.
- Bluetooth options: Configure a device locally, advertise status, or build a mobile-controlled prototype.
- Multiple interfaces: Use GPIO, UART, I2C, SPI, ADC, or PWM depending on the module and project design.
- Low-cost prototyping: Build several test nodes without committing to a large custom hardware design.
- Compact form factor: Create small wall, ceiling, desk, or embedded devices with minimal hardware.
- Power-management options: Put the ESP32 into sleep modes when your application can tolerate delayed updates.
The ESP32 also gives you room to add supporting components. A single radar module esp32 project might include a display, buzzer, relay, LED strip, environmental sensor, battery monitor, or local button interface. That flexibility is why ESP32 is often chosen for proof-of-concept radar builds before a project moves to a custom PCB.
Common radar module types for ESP32 builds
Not all radar modules behave the same way. Some are designed for simple motion detection, while others are built for human presence sensing or distance-aware tracking. Before writing code, it helps to understand what kind of signal your module provides.
Simple Doppler motion modules
Basic microwave Doppler modules detect motion by observing changes in reflected signals. They are often used as alternatives to PIR sensors when you need detection that is less dependent on body heat or line-of-sight through certain materials.
These modules may expose a digital output that goes active when motion is detected. That makes wiring and coding simple, but the data is limited. You may know that something moved, but not exactly where it is or whether a still person remains in the room.
Simple motion modules are useful for:
- Entryway triggers
- Security experiments
- Object movement detection
- Low-complexity automation
- Learning how radar differs from PIR sensing
The tradeoff is control. If the module only gives you one output pin, your ESP32 can debounce, delay, filter, and transmit the event, but it cannot extract rich target information that the module never sends.
mmWave presence modules
Many modern ESP32 radar projects use mmWave presence modules. These modules are often designed to detect human presence, including subtle movement such as breathing or small posture changes, depending on placement, tuning, and the sensor’s capabilities.
A presence-focused module may communicate over UART and provide configuration options such as detection zones, sensitivity levels, hold times, and status values. This makes the software more interesting, because your ESP32 can read structured data instead of just checking one input pin.
Presence modules are especially useful for:
- Smart lighting that should stay on while someone is still present
- Occupancy-aware HVAC or fan control
- Desk, room, or workstation monitoring
- Private local automation without using a camera
- Assistive sensing projects where visual monitoring is not appropriate
The main challenge is tuning. A sensor that is too sensitive may react to fans, curtains, pets, or movement outside the intended area. A sensor that is not sensitive enough may miss still occupants. Good placement and careful configuration matter as much as the code.
Distance and ranging modules
Some radar sensors provide distance or range information rather than only motion or presence. In an esp32 radar prototype, this can support parking aids, robotics experiments, object detection, doorway counters, or interactive installations.
Distance-capable modules may output values over UART, I2C, SPI, or another interface. The ESP32 can use that data to make decisions based on zones, thresholds, or trends. For example, your code can ignore objects beyond a certain range, trigger only when something approaches, or smooth readings over time to avoid rapid switching.
These modules require more design thought. You need to decide how often to sample, how to handle noisy readings, and what counts as a real event. In many cases, range data becomes more useful when paired with state logic rather than a single threshold.
Choosing the right radar module for your goal
The best module is not always the most advanced one. It is the one that matches the environment, output type, budget, power plan, and complexity level of your project. A basic motion module may be perfect for a garage trigger, while a configurable mmWave presence module is better for a room that needs reliable occupancy awareness.
Before buying or wiring anything, define the job clearly. “Detect people” is not specific enough. You need to know whether the target is moving or still, how far away it may be, how quickly the system should respond, and what should happen after detection.
Use this checklist before starting an esp32 radar project:
- Detection goal: Do you need motion, presence, distance, direction, or only a simple trigger?
- Output interface: Does the module use GPIO, UART, I2C, SPI, analog output, or a vendor-specific protocol?
- Logic voltage: Is the module compatible with ESP32 3.3 V logic, or does it need level shifting?
- Power requirement: Can the ESP32 board supply enough current, or should the sensor have a separate regulated supply?
- Mounting position: Will it be on a wall, ceiling, enclosure front, robot chassis, or hidden behind plastic?
- Detection area: Do you need a narrow zone, broad room coverage, or short-range object sensing?
- Configuration tools: Can the module be tuned from the ESP32, a serial tool, switches, or a companion app?
- False-trigger sources: Are there fans, moving plants, pets, vibrating surfaces, reflective objects, or nearby rooms?
- Privacy needs: Would radar provide enough information without the sensitivity of a camera-based system?
- Development support: Are example sketches, datasheets, pinouts, and community notes available for the module?
This early planning prevents one of the most common mistakes: picking a sensor based on a headline feature and later discovering that its data format or detection pattern does not suit the project.
A practical wiring approach
Most ESP32 radar module wiring starts with power, ground, and one communication path. The exact pins depend on your ESP32 board and your module, so always check the datasheet and pin labels. Never assume that two modules with similar names share the same pin order.
For a simple digital-output module, you may connect:
- Module VCC to the correct regulated supply
- Module GND to ESP32 GND
- Module OUT to an ESP32 GPIO input
- Optional enable or configuration pins, if provided
For a UART-based module, you may connect:
- Module VCC to the required supply
- Module GND to ESP32 GND
- Module TX to an ESP32 RX pin
- Module RX to an ESP32 TX pin, if configuration commands are needed
- Optional output, enable, or reset pins as described by the module documentation
The most important wiring rule is voltage compatibility. Many ESP32 GPIO pins are not designed for 5 V logic. If a radar module outputs a higher logic level, use a proper level shifter or voltage divider where appropriate. Likewise, if the module draws more current than your board can comfortably provide, use a separate regulator with a shared ground.
Physical layout matters too. Radar modules can be affected by mounting material, nearby metal, enclosure shape, and orientation. Avoid placing the sensor directly behind thick metal, dense electronics, or unstable mounting surfaces. If the module includes an antenna area, keep that area clear according to the manufacturer’s recommendations.
How do you plan an ESP32 radar project?
Plan an ESP32 radar project by starting with the behavior you want, then selecting the sensor, interface, enclosure, and firmware around that behavior. The best workflow is to test the module on a desk first, tune it in the real environment second, and only then build the final enclosure or automation logic.
A reliable project usually follows these steps:
- Define the event clearly. Decide whether the system should detect first motion, continuous presence, object distance, approach, departure, or lack of activity.
- Choose the simplest suitable module. Avoid unnecessary complexity if one digital output is enough, but choose a richer UART or ranging module if your logic needs more detail.
- Prototype with serial logging. Print raw readings, status changes, or parsed values before connecting relays, lights, or cloud services.
- Test in the real locati0n. A desk test cannot reveal every reflection, wall effect, or false trigger source in the final space.
- Add filtering in code. Use confirmation windows, hold times, cooldowns, moving averages, or state machines instead of reacting to every single reading.
- Design for safe outputs. If the ESP32 controls mains-powered equipment, use properly rated relay modules, isolation, enclosures, and local electrical rules.
- Make tuning accessible. Store thresholds in flash memory, expose settings through a web page, or provide a serial configuration mode so you do not need to recompile for every adjustment.
- Log edge cases. Record when false triggers or missed detections happen so you can adjust placement and thresholds based on evidence.
This process keeps the project grounded. Instead of chasing perfect detection immediately, you build a feedback loop: observe, adjust, test, and repeat.
Firmware patterns that make radar data useful
The firmware for a radar module esp32 build should do more than read a pin or parse a serial packet. Good firmware turns raw sensor behavior into stable, meaningful states.
A basic motion sketch might start with digitalRead(), but a useful automation node usually needs timing logic. For example, you may want lights to turn on quickly when motion appears but remain on for a few minutes after detection stops. If you turn them off immediately, the system will feel jumpy and unreliable.
Common firmware patterns include:
- Debouncing: Ignore rapid changes that happen faster than a realistic human event.
- Hold time: Keep the “occupied” state active for a set period after the last detection.
- Cooldown time: Prevent repeated triggers from sending too many network messages.
- State machines: Track states such as idle, motion detected, occupied, clearing, and vacant.
- Threshold filtering: Require readings to pass a minimum value before acting.
- Zone logic: Treat near, middle, and far detections differently when the module provides range data.
- Watchdog recovery: Restart or reinitialize communication if the sensor stream stops unexpectedly.
- Local fallback: Keep essential behavior working even if Wi-Fi is offline.
The ESP32 can also host a small web interface for status and settings. This is especially helpful for radar because final tuning often happens after installation. Being able to adjust sensitivity, timeout, or reporting behavior from a browser can save a lot of time.
Useful project ideas with ESP32 radar
A good radar project solves a specific problem without adding unnecessary complexity. Here are several ideas that fit different skill levels.
Room occupancy lighting
A presence sensor can help lighting feel more natural than a basic motion detector. The ESP32 can turn lights on when someone enters and keep them on while the sensor still detects presence. This is useful in offices, bathrooms, closets, workshops, and utility rooms where people may stay still for periods of time.
The main design challenge is avoiding false triggers. Place the module so it covers the occupied area but not a hallway, window, fan, or adjacent room. Add a hold time so brief dropouts do not switch the lights off too soon.
Desk or workstation presence monitor
An ESP32 radar module near a desk can detect whether someone is seated, then report that state to a local dashboard or automation system. This can support focus lights, monitor power routines, comfort fans, or personal productivity experiments.
For this kind of build, short-range tuning is important. You want the system to detect the person at the workstation, not every movement in the room. A small enclosure and careful aiming can make the project feel polished.
Robot obstacle awareness
Distance-aware radar can help a robot detect objects in challenging lighting. The ESP32 can combine radar readings with ultrasonic, infrared, lidar, or bumper sensors for more robust behavior.
Radar alone may not give the full shape of an obstacle, so treat it as one input in a broader sensing strategy. Use zones and smoothing so the robot does not overreact to a single unstable reading.
Privacy-conscious activity sensing
Radar can be useful where cameras would be excessive. For example, a local sensor can detect movement or presence without recording images. This makes it attractive for private rooms, shared workspaces, or assistive projects where the goal is awareness rather than identification.
Privacy still deserves attention. Tell users what the device detects, where data goes, and whether events are stored. Even non-camera sensors should be designed with consent and transparency in mind.

Calibration and placement decide reliability
Many disappointing radar builds are not caused by bad code. They are caused by poor placement, unrealistic expectations, or skipped calibration. Radar sensing depends on reflections, movement patterns, materials, and geometry, so the same module can behave differently in two rooms.
Start with temporary mounting. Use tape, a bracket, or a 3D-printed test holder before committing to screws or a finished enclosure. Move the sensor higher, lower, left, right, or angled slightly, then watch the readings. Small placement changes can make a large difference.
Practical placement tips:
- Aim the module at the area you care about, not simply toward the center of the room.
- Avoid pointing it directly at fans, swinging doors, curtains, or vibrating machines.
- Keep metal away from the antenna region unless the module documentation allows it.
- Test with people sitting, standing, entering, leaving, and staying still.
- Check whether movement behind thin walls, doors, or plastic panels causes unwanted detection.
- Use an enclosure material that does not block or distort sensing for your module.
- Re-test after moving furniture, adding appliances, or changing the mounting height.
Calibration should include both normal and annoying situations. Walk past the room. Sit very still. Run the fan. Open the door. Let the system run for a day and log state changes. A project that works for five minutes on a bench may still need tuning before it behaves well in daily use.
Common mistakes to avoid
A radar build can become frustrating when the hardware and expectations do not match. Fortunately, most issues are predictable.
Avoid these common mistakes:
- Skipping the datasheet. Pin order, voltage, interface type, and configuration behavior can vary widely.
- Powering everything from a weak source. Brownouts, resets, and unstable readings can come from poor power design.
- Using 5 V signals on ESP32 GPIO. Protect the microcontroller with correct level shifting when needed.
- Expecting camera-like information. Most hobby radar modules detect presence, motion, or range, not detailed identity or imagery.
- Mounting before testing. Permanent placement should come after real-world trials.
- Ignoring false positives. Fans, pets, reflections, and adjacent spaces may need filtering or repositioning.
- Publishing too many events. Send meaningful state changes, not every raw reading.
- Overcomplicating the first version. Start with serial logs and local behavior before adding dashboards, automations, and cloud integrations.
The simplest way to reduce risk is to build in layers. First confirm that the ESP32 can read the module. Then confirm that readings make sense in the real environment. After that, connect the output action.
A simple architecture for dependable automation
A dependable esp32 radar node usually has four layers: sensing, interpretation, communication, and action. Keeping these layers separate makes your project easier to debug and expand.
At the sensing layer, the ESP32 reads the module through GPIO, UART, or another interface. At the interpretation layer, your code filters readings and decides whether the area is vacant, active, or occupied. At the communication layer, the device sends useful state changes to another system. At the action layer, it controls a light, relay, display, notification, or automation rule.
A clean architecture might look like this in plain language:
- Read the radar module at a steady interval.
- Validate the reading or packet before using it.
- Update an internal state such as vacant, motion, or occupied.
- Apply hold-time and cooldown rules.
- Publish only when the stable state changes.
- Keep local safety behavior independent of network status.
- Save configuration values so tuning survives reboot.
This approach prevents messy code where one sensor pulse immediately triggers everything. It also makes it easier to swap modules later. If you keep your detection logic separate from your Wi-Fi or relay logic, you can improve one part without rewriting the whole project.
Testing your build before daily use
Testing should be deliberate, not casual. Once the wiring works, run your esp32 radar project through situations that match real life. If the project controls lighting, test at night and during the day. If it tracks room presence, test one person, multiple people, pets, and empty-room conditions.
A useful test plan includes:
- Startup behavior: What happens when power returns after an outage?
- No-target baseline: Does the module report stable empty-room values?
- Fast entry: How quickly does the system respond when someone enters?
- Still presence: Does it continue to detect someone reading, typing, or sitting quietly?
- Exit timing: How long does it take to return to vacant after someone leaves?
- False-trigger check: What happens when a fan runs, a door moves, or someone passes nearby?
- Network loss: Does the local behavior remain safe if Wi-Fi disconnects?
- Long run: Does the device keep working after hours or days without manual reset?
Do not treat one successful trigger as proof that the project is finished. Radar systems become trustworthy when they behave consistently across edge cases.
Safety, privacy, and practical limits
Small radar modules are common in electronics projects, but they still deserve responsible use. Buy modules intended for your region and application, follow the manufacturer’s operating guidance, and do not modify RF hardware in ways you do not understand. If the project controls electrical loads, use properly rated components and safe enclosures.
Privacy is also part of good design. Radar is less visually invasive than a camera, but it can still reveal activity patterns. If other people share the space, explain what the sensor detects and how the data is used. Local processing, minimal logging, and clear status indicators can make the project more respectful.
Finally, remember that radar is not magic. Some modules struggle with specific angles, materials, distances, or stillness levels. Others are excellent in one use case and poor in another. Treat the module as a sensor with strengths and limits, not as a universal detector.
Final takeaway
A radar module esp32 build is one of the most practical ways to explore smart sensing without jumping into complex RF design. The radar module handles detection, while the ESP32 adds logic, connectivity, configuration, and automation.
For the best results, choose the module around the behavior you need, verify voltage and interface details, prototype with logs, and tune the sensor in the real environment. A thoughtful esp32 radar project does not depend on a single clever sketch; it combines good placement, stable power, careful filtering, and realistic expectations. Start simple, test patiently, and you can build a radar-based device that feels reliable rather than experimental.
Not sure which sensor fits your project?
Talk to our mmWave application engineers for a free consultation.
Specify your hotel project with our engineers
Send your room count, ceiling type, and protocol preference. We will return a sample plan and quote within 24 business hours.
- Move from general guidance into a product or application discussion.
- Use RFQ when pricing, drawings, MOQ, or launch timing needs structure.
- Keep a direct contact path visible for fast clarifications and handoff.